
How to Plan a Kid’s Birthday Party
Disclosure: Some of the links below are affiliate links, meaning that at no additional cost to you, I will receive a commission if you click through and make a purchase. Read my full affiliate disclosure here.
One of my favorite things to do is to plan parties!!! I have three sweet kiddos that are growing waaaay to quickly! Something that Austin and I prioritize is having birthday parties for our kids. My mom was a pro at planning and executing fun, themed birthday parties for my sister and me and I want to give my children their own fun memories!
Throwing an awesome kid’s birthday party doesn’t have to be super elaborate or break the bank! No matter what your budget or situation, this step by step guide will help you plan a party your kids will love and you will feel proud of!
Step 1: Decide What Your Budget Is!
There are many facets to this part of the step, but party spending can get out of control so easily (I’ve been guilty of this!) All of the aspects of your budget will include:
Location
Guest List
Invitations (Printing costs, envelopes and postage)
Time of the Party (this will affect how much food you will provide)
Activities at the Party (this may be included in location, such as Chuck-E-Cheese or a Roller Rink)
Food
Cake
Party Favors
Step 2: Pick a Location!
Once you have your budget in place, you can start shopping around for birthday packages at event venues or you can have a party at home! Now that we live in a house with an awesome, large backyard and space to host parties, we love having parties at our house!
There are SO many great options if you’d rather have the party at a location other than at home. Many of these places have all inclusive packages, including the activities. Here are some ideas: Trampoline Park, Chuck-E-Cheese, Roller Skating Rink, Bowling Alley, Swim School, Gymnastics, Ice Skating, Local Playground, Petting Zoo, Indoor Playplace.
Step 3: Decide on a Guest List
This is one of the hardest part of parties for me. Take your location and budget into account. Some venues have packages based on the number of guests.
For my children’s birthday parties, we have kept the guest list mainly to family and a few close friends for their birthdays 5 and under. We are blessed to have family close by! My son is about to turn 3 so he still has some family parties left to go, but my girls are a couple of years into school, so we have had fun including their friends! If your child is in school, be sure to review the school’s policies on distributing invitations at school. My girls class rules are that you can send birthday invitations to school if you include the entire class or all of the same gender (for example, all of the girls if your child is a girl). If possible, I like to get the mailing addresses of their friends by texting or emailing the parents. This also makes it easier to track RSVPs and to send thank-you notes!
Step 4: Decide on a Theme for the Party!
The theme goes hand in hand with the location and activities you are planning to do at the party. A couple of years ago, we held my oldest daughter’s party at her gymnastics facility so the theme was gymnastics (and unicorns- we were actually able to combine these with a super cute invitation from Zazzle!). The theme will determine a lot about the rest of your party! I like to ask my kids what kind of party they would like to have! Just a pro tip- wait until a couple of months before the party so they don’t have time to change their minds a few times, and communicate that once the invitations are ordered, there is no changing the theme!
My youngest daughter has a birthday in August, and this year she wanted to do a summer party at home so we decided on a “Pink Lemonade” theme and it was so cute and perfect! I will be sharing details of that party as examples!
Step 5: Decide on a Date and Time for the Party!
Now that you have the location and theme figured out, nail down the exact date and time. Take food into consideration when determining the time of the party! If the party is around lunchtime or dinnertime, your guests will probably expect a meal!
Also take younger sibling’s naptimes into consideration! Sometimes it works best to have my son napping upstairs during a party and sometimes it’s fun to let him join in on the fun, especially if it’s during lunchtime.
I also check the school calendar to make sure the party isn’t during a fall break or right before a teacher workday (that will reduce the guest lists because friends are travelling!).
Step 6: Send the Invitations!
Send out your invitations at least 4 weeks before the party! This should give most of your guests plenty of time to be able to come! My family are all advanced planners, so I usually pick the date of the parties a few months in advance, and let grandparents and out of town family know when the party will be so they have ample time to plan!
When it comes to invitations, you need to decide to either send hard copies of invitations or you can send digital copies. If you send hard copies, I usually purchase a digital download invitation on Etsy or Zazzle (there are SO many options!) and then get it printed and cut at a FedEx Kinkos on card stock. Then, I purchase coordinating envelopes (usually off Amazon), purchase stamps from the post office and mail them! My kids love putting the stamps on the envelopes and kids in general enjoy getting mail of their very own!
Sometimes its easier (and much more cost efficient!) to send digital invitations! There are so many great options- I recommend searching on Pinterest for options that fit your theme and customize them to your party’s details! Since it was the summer and my daughter’s summer party had a more casual feel, I sent digital invitations! This is the invitation I used, which you can find on Zazzle! I customized it, screen shot it and sent it out via text!

Step 7: Plan the Itinerary for the Party!
Ah, a plan to make a plan! This step is really important because it will frame out the entire experience of the party and will give you a good idea of the flow. Take the following into consideration: time to eat, time for activities, when you will sing “Happy Birthday” and when/if the birthday boy or girl opens presents! There is a delicate balance to strike here. I like to keep it simple, because less really is more most of the time!
I usually do two or three activities at my parties. For example, my oldest daughter had a princess birthday party last year. We did a “Princess Ball”, where each girl was announced and we did a dancing lesson all together. Then, we went outside and did a pinata. Those two things, combined with snack time, cake and presents filled the time beautifully! Also, you want to give your itinerary some room to breathe, especially on the front end of the party, to allow time for guests to arrive! For my younger daughter’s lemonade stand party this year, here was our itinerary:
11:00- Guests Arrive- Kids Can Play on the Bouncy Waterslide, Trampoline, Playground or Kiddie Pools
11:45: Pizza Arrives- Break for Lunch- Kids Eat Picnic Style on blankets under the trees
12:15: Sing Happy Birthday and Serve the Cake!
12:30: Open Presents
1:00: Party Ends
When you are planning activities, take the guests ages and genders into account! My daughter’s princess party only had girls in attendance last year so we did more girly things. The Lemonade Stand Party had both boys and girls (and parents!) ranging in age from a few months old to 9 years old! Take the comfort of all of your guests into consideration when planning activities!
Step 8: Plan the Setup for Your Party!
This step is entirely dependent on where your party is taking place! At my daughter’s gymnastics party, they had party rooms with everything all set up for you and all we had to do was show up with a few decorations, cake and snacks!
If your party is at your home or an event venue, take the time to study and plan where things are going to go! Even sketch out where everything will go on a piece of paper! Look at your spaces and think about: capacity, functionality and practicality. Take the number of guests into consideration, the time of day, and the time of year! Have a place to:
Serve Food and Drinks
Serve Cake
Put Gifts
Open Gifts (if you choose to do that at the party)
Do Planned Activites
For my daughter’s Pink Lemonade Party, since it was in August, we knew we wanted to host it in our backyard! We have a really large, flat backyard that is fenced in and (thanks to my amazing sister in law and her family) a trampoline and playground. We also have a patio on one side of our playroom and a deck on the other side!
A few weeks before the party, I walked through my backyard with my sister and decided where everything was going to be! It’s so interesting how you notice how big or flat parts of your yard are when you’re setting up a pool or tent!
The guests entered through the gate into our backyard and the deck in front of them was a place they could put towels and apply sunscreen! I had a little basket with several spray and lotion sunscreen options for the guests to enjoy. This area also had a water table filled with some plastic toys for our toddler guests.
To the left, we set up two kiddie pools with some water guns and other toys! My son spent the majority of the party getting out of one pool and into the other one!
The trampoline and playground are towards the far back of our backyard and, obviously, they didn’t move.
We set up the bouncy waterslide in a part of the yard that it wouldn’t block where people needed to walk, but the hose could still reach it!
On the opposite side of the yard from the gate, I set up a 10x20 white event tent that has been worth every penny of the $100 I bought it for 11 years ago! We used one half of it for food and the gift table and the other half of it for shaded seating.
In the center of our backyard, we have large, beautiful pecan tree. It provides a lot of shade, especially around lunchtime, so we spread blankets out for a picnic, which fit the Lemonade Stand theme really well. We also had a bunch of folding/outdoor chairs that parents could use.
Lastly, I wanted a place people could take photos with the birthday girl! I put that area and the Lemonade Stand itself on our patio!
The biggest takeaways here are to use what you have to your advantage. Really think through your space (whether it is indoor or outdoor) and think of it from the vantage point of your guests and through the lense of functionality!
Step 9: Plan and Purchase the Decorations and Supplies for the Party!
This step will depend greatly on your theme, your budget and where your party is! For venues like the Trampoline Park or Roller Rink, decorations are very minimal and you may only need to provide cups, plates and utensils for cake!
This is the really fun part for me! If you are creative (like my sister), this is your time to DIY and craft to your heart’s content! If you appreciate this talent in others (like me!) you can scour Pinterest for ideas and purchase items from Amazon, Party City, Etsy or (my favorite), Dollar Tree!
For my parties, I like to think through what the experience will be for the guests from when they are pulling into the party until they are walking out the door. Kid’s parties are easier in a sense because they are more casual than a bridal or baby shower, for example!
Areas to Consider Decorating:
Balloons on the mailbox, gate (or outside your venue) to indicate where to go
Welcome Sign (can be a cute chalkboard, printed poster board, etc)
Food Table (tablecloths, runners, flowers, confetti, centerpieces, food labels, serving pieces, plates, napkins and utensils)
Drink Area (drink dispensers, cups, ice, coolers)
Gift table (tablecloths, sign, paper or notebook to write down gifts)
Seating (tablecloths, centerpieces, flowers)
Space Decorations (balloon area, photo area, banners, streamers, etc)
Modify this list to where your party is taking place! We’ve held parties in party rooms, picnic pavilions, at our home and in our backyard!
Also, to save on cost, consider what items you already have as you are deciding on the color scheme or theme! I typically use the same cake stand, pewter serving trays, drink dispensers and tablecloths for my parties!
When my oldest daughter turned 1, we had a strawberry theme and went all out at an event venue! We invested in white tablecloths that we have used SO many times since! My mom made pink and white gingham table runners for that party and we have used them at several parties since! You can use plastic tablecloths (which I’ve also done) but I think that cloth tablecloths add a nice finish to any party!

For this particular party, I actually already had a Lemonade Stand, thanks to a friend of my mom who gave it to us when she retired from teaching! It made the cutest place to serve the Pink and Yellow Lemonades! I also already had the lemonade sign- it usually hangs in my kid’s playroom!

Stick around long enough and my love of anything Pioneer Woman will come out! My mom bought the drink dispensers for my sister’s baby shower last year and we’ve already used them several times!
Here is the pink lemonade decor we purchased off of Amazon! I used the banners for several things (not just banners) throughout the party. I love these party packs like this because they give you great options and are inexpensive!

Here is what the event tent looked like! (Ignore the wrinkled tablecloth!)

Like I mentioned before, we bought this tent off Amazon years and years ago for Austin’s graduation party when he earned his Masters Degree. We have used it and other family members have used it! It cost less to purchase it than to rent one and we can use it over and over again! This isn’t the exact one (since it has been 11 years), but this tent is very similar to the one we have!

I didn’t get a great picture of these at the party, but we used plastic yellow banners on two of our fences to create a fun and festive atmosphere! They are really durable and really inexpensive!

My sister has the creative gene and the enjoyment of crafting and DIY that I don’t have! She had several pallets left from a landscaping project so she brought them, along with some stencils, and we made this sign for the party! It was the perfect sign to have by our garage, pointing our guests in the right direction! My daughter was so happy with how it turned out and that she helped make it!

My sister also generously let us borrow her balloon arch circle! It came with plastic rings with indentations for the balloons. After two attempts, however, I have decided that I’m not naturally gifted at making balloon arches! I ended up with two balloon “clusters” for the photo area, but I really ended up liking the look!

Here is a similar balloon arch you can purchase!
Step 11: Decide what activities will happen at the party!
We’ve already talked about this a little bit in the itinerary section! If your party is taking place at somewhere other than a home (like a playground, Bowling Alley, Ice Skating Rink), the party naturally revolves around the activity.
However, if you are hosting a party at home, you want to have some fun things for your guests to do (besides eating cake and watching presents be opened!) I usually pick 2 or 3 activities that go along with the theme of the party! Some good general birthday party activity ideas are:
Bouncy House
Pinata (get cute bags for the candy and this can serve as your party favor!)
A Craft (make sure this is age-appropriate for your guests and not too complicated!)
Dance Party (there are SO many options here!)
Games (Limbo, Twister, Pin the Tail on the Donkey, Board Games, Bingo, Treasure Hunt- don’t be afraid to be cheesy
Step 12: Make a Plan for the Birthday Cake (or Dessert)
I have the cake listed before the other food because it is just such a centerpiece for children’s birthday parties! Even if there is no time or no other food present at the party, there is usually always a birthday cake!
Whether you are making your child’s birthday cake yourself or someone else is making it, talk to them about what kind of cake and icing they want! I like to stick to basic flavors: white cake, yellow cake, chocolate cake or funfetti cake so that all the kids will enjoy it. You can always add food coloring to white cake to play with fun colors! The exterior of the cake should fit with the theme of the party.
The size of the cake will depend on how many guests you are expecting!
If you are ordering the cake from a bakery or individual, be sure to order it several weeks ahead! A lot of bakeries will have a catalog of options they can make. If you want to make it more unique or order a specialty cake, be prepared to pay more for it! You can even search Pinterest for inspiration.
If you want to make your child’s birthday cake (which is something I love to do!), my biggest recommendation is NOT to wait to bake the cake until the day before the party. I like to bake the layers a couple of weeks ahead and freeze them! Then, the day before the party, I thaw the layers, make the icing and decorate the cake and that system is SO much better than staying up until 2 am the night before the party waiting for cake to cool so the icing doesn’t melt- haha.
Plan for what is going on the cake! Are you planning to have candles, a topper or any other decorations? The baking section at grocery stores, Dollar Tree and other major retailers like Target, Walmart and Hobby Lobby have tons of topper and candle options!
Sometimes, kids don’t prefer cake for whatever reason! My oldest daughter went a party for a boy in her class and he had donuts instead of a cake! They were a big hit! Remember that the birthday party should reflect your child! Make the party full of things that your child enjoys!
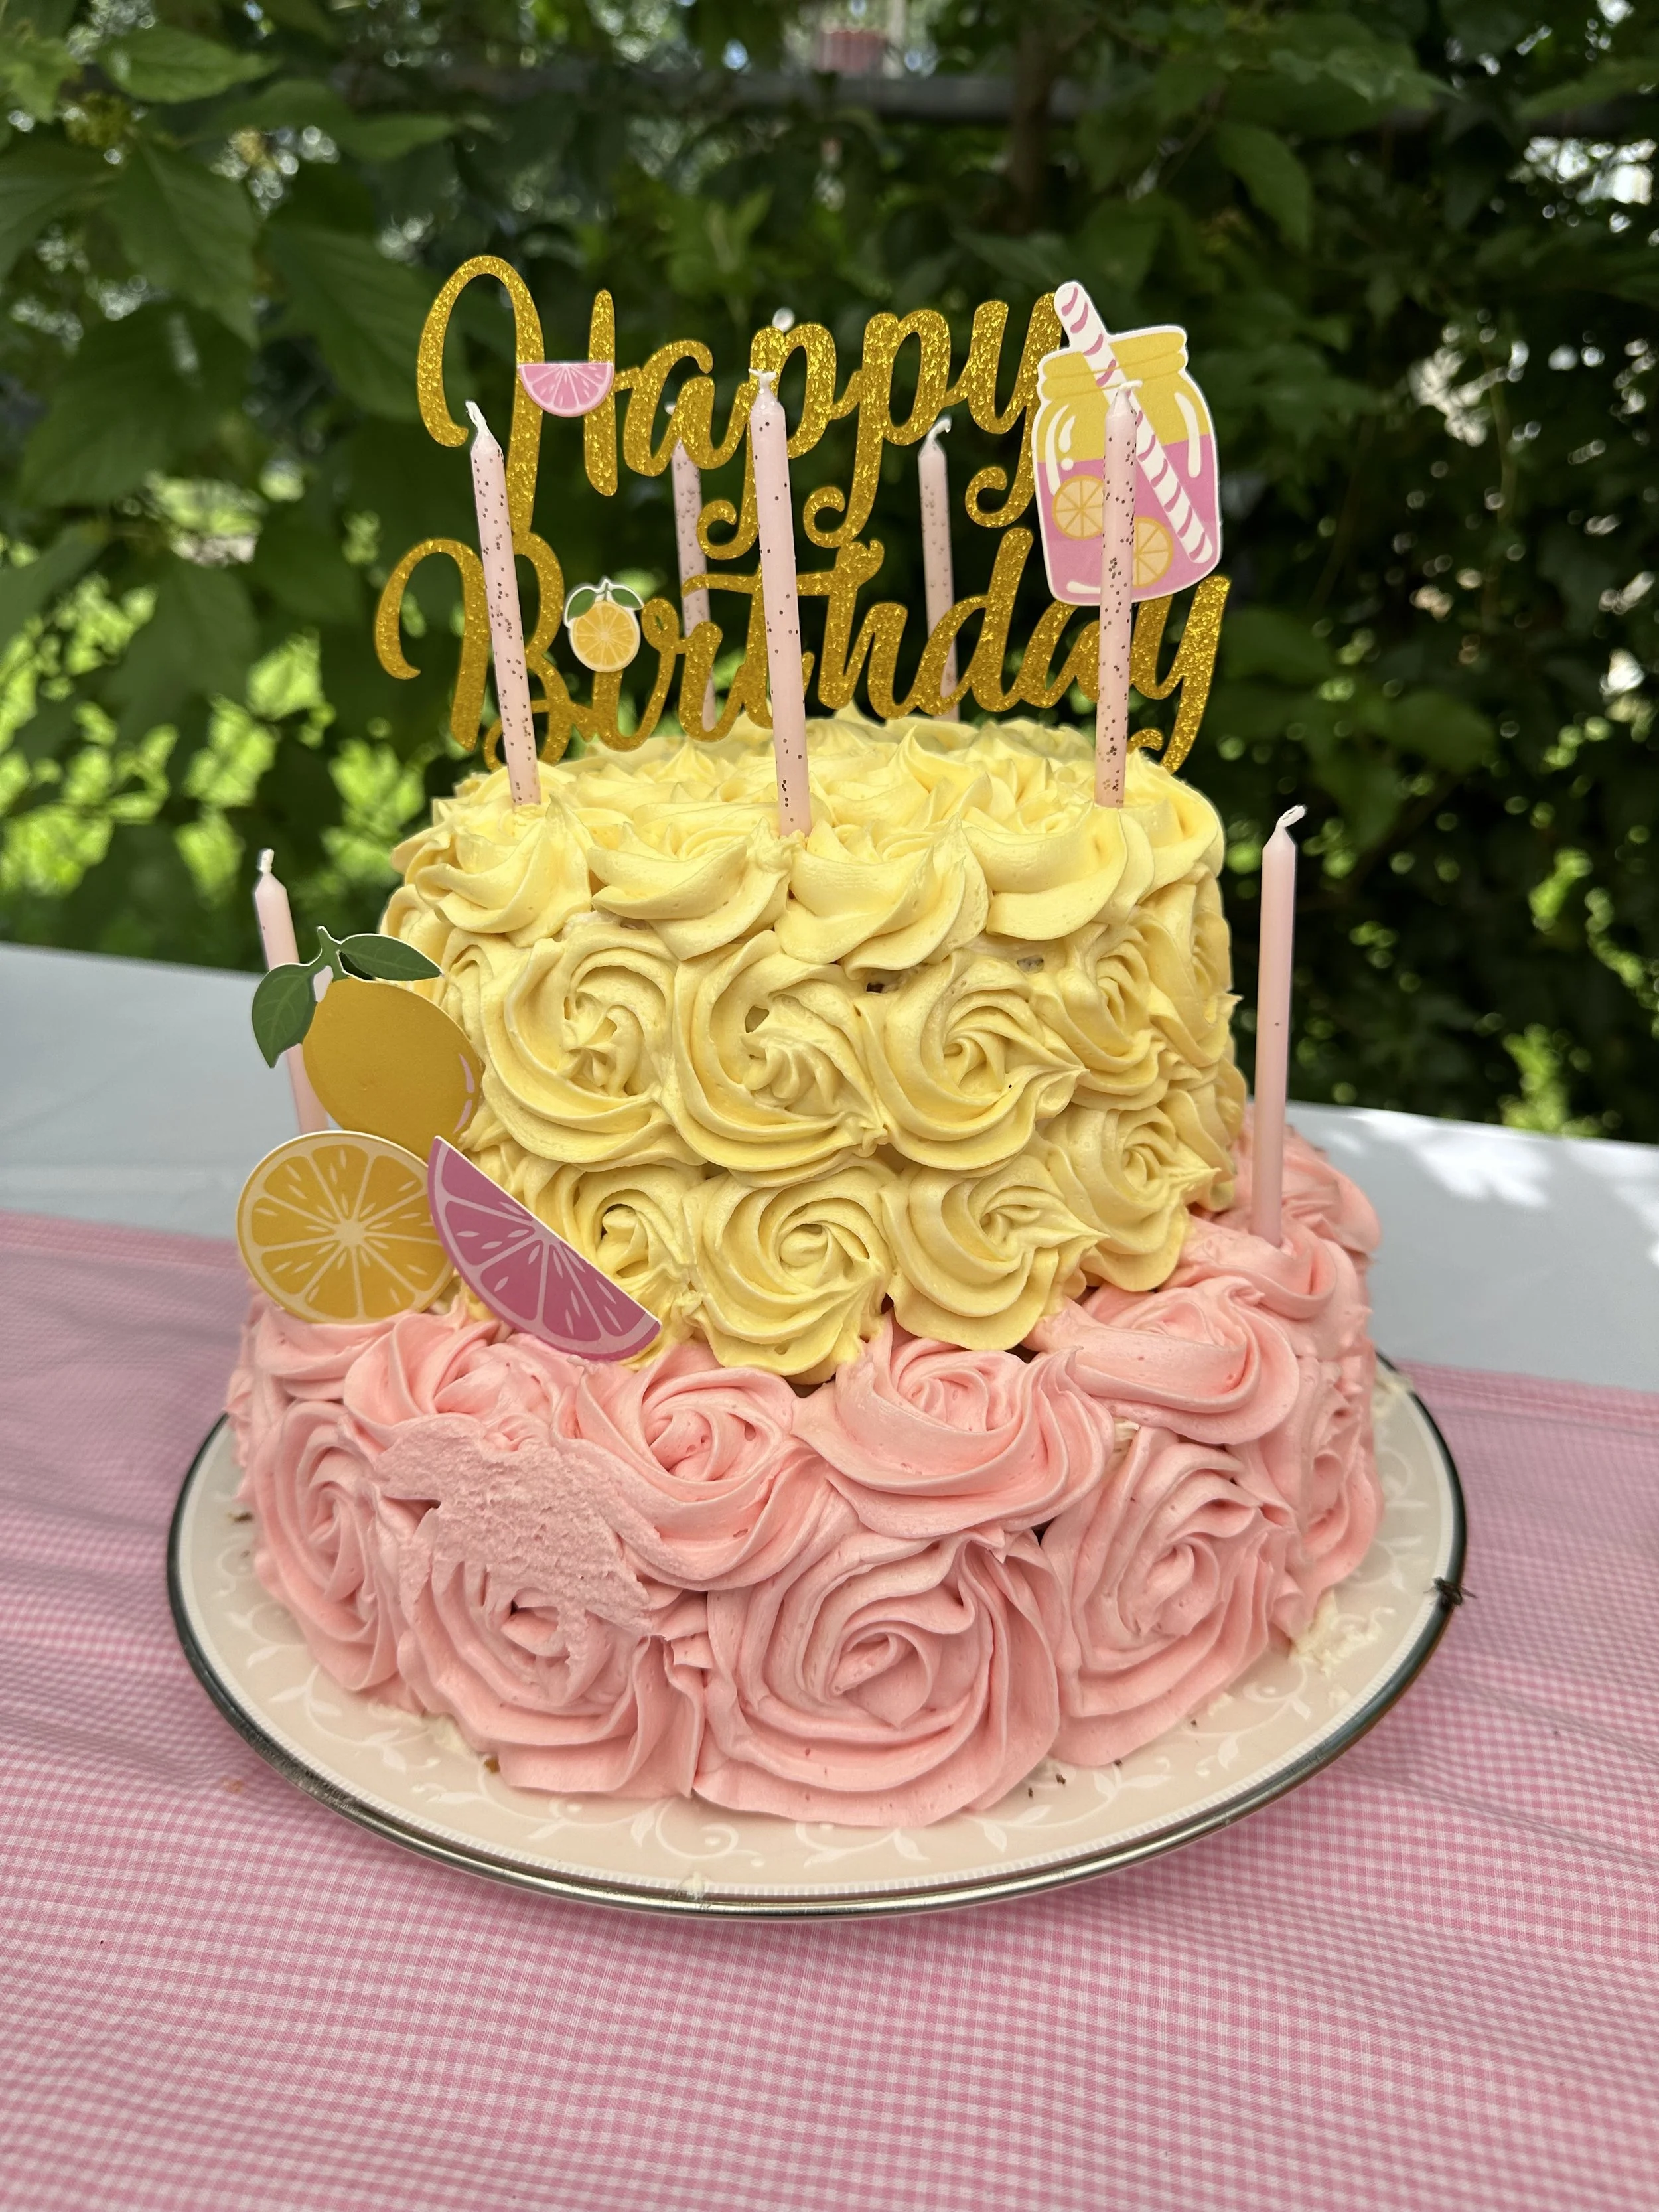
I made my daughter’s cake! The top layer was white cake and the bottom layer was chocolate cake! I made buttercream icing and covered the cake in large rosettes (even though someone smudged one of them). The cake topper and lemon appliques came from the Pink Lemonade bundle from Amazon and the pink candles are from the Dollar Tree!
Step 13: Figure out the Food and Drinks
Food is one of my favorite things about a party! How much food you have will depend on how many guests you have and what time your party is happening ! If your party begins or ends within an hour of mealtimes, you need to serve enough food to be a meal. If you don’t want to serve a meal, consider having your party from 2-4 pm!
My biggest piece of advice for food at a party is to keep it simple! You don’t need 10 themed food items (unless you really want them!). Take your child’s preferences into consideration and the taste buds of kiddos! Pizza is always a safe choice and we are big fans of Chick-fil-A nugget trays as well! I always try to have at lease one fruit or vegetable option just to offset the other not-as-healthy food. Think about options that are easy and individual servings (such as snack bags of chips versus a bowl of chips).
With drinks, keep it simple as well! I ALWAYS have water bottles, either mini or regular size. There are so many awesome water bottle labels on Etsy that you can use to tie the water bottles into the theme! I also like to have a large cooler with a variety of juice boxes, some soda (if there will be adults at the party!). At a summer party, I also like to serve iced tea and lemonade in drink dispensers!
The last area you need to plan with food and drinks is to have plates (some for the food and smaller ones for the cake), utensils, napkins and cups. You can go any direction with this. I usually go for solid color plates and napkins in more than one color to compliment the other decor!
This is what I served the the Pink Lemonade Party!
Food: Pizza (I usually account for 2 pieces per person), variety of snack bags of chips, Princess and Dinosaur Gummies, Watermelon Slices
Drinks: Lemonade, Pink Lemonade, Water Bottles, Capri Suns, Cans of Coca Cola, Root Beer and Sprite!
Step 14: Party Favors
I like to think of party favors as a the part of the party that goes home with your guests! There are so many ways to do a fun favor- it doesn’t necessarily have to be a goody bag! Some of my favorite favors are: buying a cute bag to put candy in from a piñata, a cookie or two with a cute sticker on it, or taking home a craft the kids made at the party! Be creative and have fun!
Step 15: Send a Thank-You
I love writing and receiving hand-written notes! I believe that a simple, heartfelt thank you note will never go out of style! As soon as your kiddos are able to write one for themselves, it teaches them a skill that is considerate, classy and will serve them well their entire lives.
While your child is opening gifts at the party, ask another family member or adult to write down which is gift is from whom! That way, it will make writing thank you’s a piece of cake!
If your kids are too small to write, you can write a thank you note for them and let them sign it! Or, especially if you didn’t open gifts during the party, you can send thank you videos from your kids!
Well, that’s it! 15 steps to plan an awesome kid’s birthday party! Let me know if this guide is helpful to you! Enjoy planning your party and remember to have fun along the way!